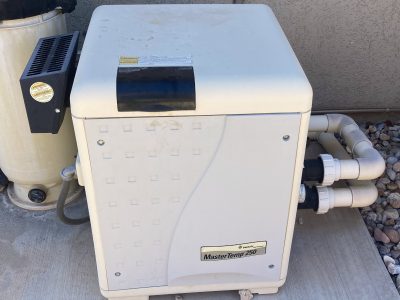
If your Pentair Mastertemp pool or spa heater has stopped working or is just not functioning as it has in the past, this guide is designed to help you troubleshoot, diagnose, and fix the issue.
While this guide is specific to many of the components found on Pentair Mastertemp heaters, most heater brands such as Hayward, Jandy and more use similar components.
Table of Contents
- How does a Pentair Mastertemp work?
- Check water flow
- Recommended swimming pool heater flow rates
- Check your pool filters to ensure proper flow
- Recommended pool Cartridge filter cleaning interval
- Recommended Salt Cell Cleaning interval
- Error codes on the automation panel
- Reset the swimming pool main power supply
- Errors on the heater control panel.
- Errors on the heater control circuit board
- Pentair Mastertemp Manifold Replacement
- How to bypass sensors to test functionality
- What to replace with no codes present
- How to test the thermal regulator
- ERR PS
- ERR HLS
- ERR AFS
- ERR IGN
- ERR AGS
- How to correctly size the gas pipe for your Mastertemp Heater
- ERR SFS
- E05
- E06
- E01
- 126 Error
- Burner Troubleshooting
- Heat Exchanger Troubleshooting
- Troubleshoot a Bad Control Board
How does a Pentair Mastertemp Swimming Pool Heater work?
A Pentair Mastertemp heater is actually a very simple appliance that becomes more complicated due to all of the interlock protection. It uses a heat exchanger that is warmed similarly to a tankless water heater to warm the water. To control the water temperature a manifold is designed to open up to let water exit back to the swimming pool once it is at its desired temperature.
The heater has a blower that pulls air and gas into the burner flame holder. A sealed heat exchanger surrounds the flame holder and discharges gases out of the flue stack or exhaust. Water is drawn through the heat exchanger through the top 2” PVC pipe going into the heater. It then is regulated via a thermal regulator to control how long it remains in the heat exchanger before exiting via the lower 2” PVC pipe back to the swimming pool.
This whole process is controlled by a control circuit board located behind the user-controlled buttons. There are many safety interlocks that will prevent the heater from working if they sense anything other than their pre-programmed conditions. Something as simple as low flow or a dirty sensor is enough to prevent the heater from operating.
Check for proper swimming pool water flow.
Anytime a heater issue is discovered, the first thing to check is the water flow. Clean or backwash your filter system to ensure there is no blockage or slowdown of flow through the filters.
Pentair brand heaters require a minimum flow rate of 40 gallons per minute to function properly with 45 GPM recommended. If you have a variable speed pump ensure your flow rate is set to 40 GPM minimum. If it is lower your heater may still work intermittently but as the water is allowed to stay in the heater for a longer period of time than recommended it may trip the over temperature limit and shut down.
Recommended swimming pool heater flow rates
Pentair Heaters – 40-120 GPM
Hayward -40-70 GPM
Check your pool filters to ensure proper flow
The second place to check your flow would be through your filters. Clean or backwash your filter system to ensure there is no blockage or slowdown of flow through the filters.
If you have sand or DE filters make sure you are backwashing the filter every two to three weeks or more often if your pressure gauge indicates a dirty filter medium.
To backwash your filter it is recommended to run the pump and filter in backwash for around 3 minutes, switch back to rinse or back to normal filtration for 1-2 minutes, and then back to backwash for another 2-3 minutes. This ensures your sand or DE is fully cleaned.
Recommended pool cartridge filter cleaning interval
If you have a cartridge filter the recommended cleaning interval varies. A simple rule of thumb is if your filter pressure has increased 10 percent more than when you first cleaned the filters it is time to clean again.
At Splash Doctor we require cartridge filters to be cleaned at a minimum of every 3 months.
Recommended salt cell cleaning interval
If your swimming pool is equipped with a saltwater generator, remove and clean the salt cell to ensure build-up is not blocking the water.
On Pentair salt cells they recommend using 1 part muriatic acid mixed with 4 parts water. You can use a Pentair salt cell cleaning stand and fill the cell all the way to the top with the acid and water solution.
On salt cells equipped with a built-in flow switch make sure the flow switch is on the bottom.
Pentair recommends a maximum soaking time of 30 minutes. If you have had the acid water solution in the cell for 30 minutes and you still have calcified debris drain and rinse the salt cell and complete a second soaking. DO NOT ALLOW THE ACID AND WATER MIXTURE TO REMAIN IN THE SALT CELL FOR OVER 30 MINUTES AT ONE TIME.
Something as small as a calcified salt cell or a small bit of debris lodged in a pipe can cause enough of a flow issue, to prevent the heater from functioning properly.
Once you have cleaned the filters and salt cell and you are sure the water is flowing correctly, there are several places you can look to further research the possible issues with your heater.
Heater Error codes on Pentair Intellitouch or Automation Center
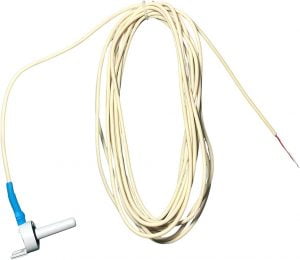
One of the easiest places to look for an error is to check your automation. Many new systems will send alarms to your phone or tablet when things go wrong. If you have a Pentair Intellitouch, EasyTouch, ScreenLogic, or another automation center, check for alarms and errors on your panel. Errors could show up as ERR for the inlet water temperature or the outlet water temperature. If you have either of these errors you need to replace your water temperature sensor.
Power cycle the main swimming pool breaker to reset the entire swimming pool electrical system.
Occasionally automation systems, pumps, and heaters will start working again if you reset the main pool breaker. Just like a computer needs to be restarted every once in a while to work at its peak performance, a simple power cycle can solve many issues. Leave the breaker off for a minimum of 30 seconds and then cycle it back on.
If you have no power at all to the heater and not just an intermittent problem it is recommended to troubleshoot the incoming electrical connection, the control board, the ignition panel, and the transformer. If you are not familiar with how to safely check electrical systems, hire a licensed electrician to check to see which components have failed. DO NOT ATTEMPT TO TROUBLESHOOT ELECTRICAL CONNECTIONS ON YOUR OWN.
A simple, DIY fix that most homeowners can do is to reset the heater, pool pump, and automation circuit breakers.
If resetting the power breaker and checking flow does not solve your heater issue, there are many other places that show errors. Two of the most common locations for error codes and lights are on the main heater control panel and the heater circuit panel.
Errors on the Heater Control Panel
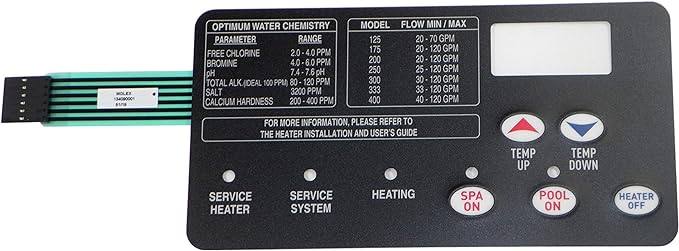
The next place to look for errors is on the heater panel itself. There are several codes that can be present. Also, there are three small lights that can help direct your troubleshooting.
The three lights that may be illuminated on your heater are as follows:
Service Heater-Indicates an issue with your heater system. One or several sensors or switches are causing the heater to not function normally. Continue reading through this guide to troubleshoot.
Service System-This usually indicates a flow issue or pressure switch failure.
Heating-If this light is solid, the heater is heating. If this light is blinking, it means the heater is trying to light but something is preventing ignition. Usually, this is a problem with an ignitor, sensor, stack flue sensor, or thermal regulator. Check your ignitor and sensors to verify where the problem lies.
There are also numerous codes that will show up on the actual display of your heater. They are as follows:
- ERR PS – Error of the pressure switch or flow problems.
- ERR HLS – High limit switch
- ERR AFS – Error of the airflow switch
- ERR IGN – Ignitor Error
- ERR AGS – Automatic gas shutoff error
- ERR SFS – Stack flue sensor
- E05 – Stack flue sensor
- E06 – Stack flue sensor
- E01 – Water temperature sensor error
- 126 – Water temperature sensor
Errors on the Circuit Board
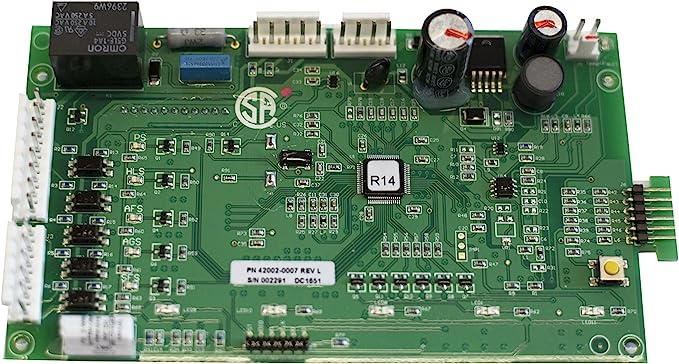
If you do not see any of these codes on the heater control panel itself, it may be necessary to check the led lights on the back of the control circuit board. Older model heaters do not show the ERR codes in the same way the new heaters do on the main control panel. On the back of the control panel there is a circuit panel. It has an area that has a list of lights that will illuminate when there is a problem detected. Each light has a code written next to it in white. Find the light that is illuminated to see what code your heater is presenting.
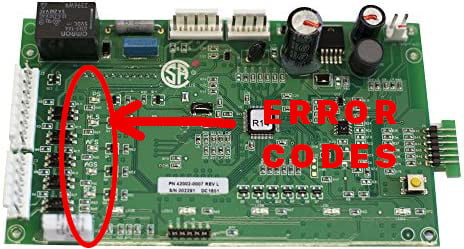
To gain access to these additional codes you will need to remove two of the heater side panels. Make sure to disconnect the power to the heater by shutting off the breaker prior to opening the heater panel. Each panel has 4 screws. You then remove 4 wing nuts located under the top heater cover in the corners. Flip the heater lid upside down and find what LCD light is illuminated to get the error code. For the panel to illuminate an error you will have to restore power to the heater and attempt to run the pool heater, pumps, and system normally. The reason it is best to switch off the circuit breaker for the heater when you are removing the side and top panels is to ensure you do not accidentally touch a live wire.
The following codes may be illuminated:
PS – Pressure Switch. This switch is located above the inlet water PVC pipe.
HLS-High Limit Switch. This switch is located on the bottom left corner output side of the manifold
The HLS light could also indicate a broken manifold valve. This is a rare occurrence and quite an expensive repair. Contacting a swimming pool service company in your area is suggested before attempting this repair. If you feel up to the task, we provide the guide as described by Pentair to replace this manifold in this section.
Thermistor and Thermal Regulator
If you need to replace either part use the links below to purchase on amazon.
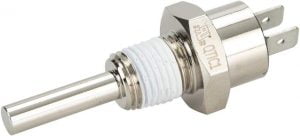
Thermistor
The thermistor doesn’t have a code but sometimes indicates E01. It is located on the top left side of the manifold.
How to test a thermal regulator
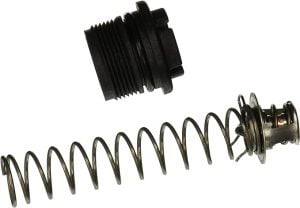
The thermal regulator is located between the 2-inch inlet water and 2-inch outlet water pipes on the manifold. Use a screwdriver sideways to unscrew the thermal regulator housing to remove the regulator. Take the regulator and place the end under hot water. If the regulator opens and closes under hot water the regulator is functioning properly.
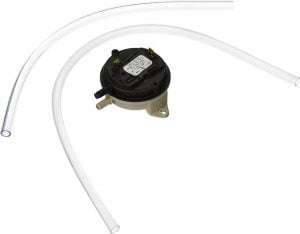
AFS-Air Flow switch connects to vacuum lines. It is located where the clear plastic vacuum lines connect.
AGS-Automatic gas shutoff. This sensor is located on the right side of the manifold below the water pressure switch.
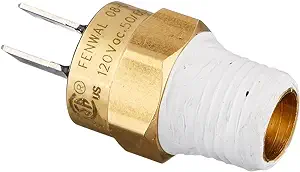
SFS-Stack flue sensor. This sensor is located on the exhaust stack.
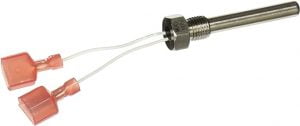
How to test interlock sensors and switches to determine functionality
If you want a quick easy way to determine if a specific sensor or switch is faulty, you can use a jumper cable to bypass the switch from the system. Cut a 3-inch piece of 14 gauge wire and strip both ends. Remove the two wire leads to the sensor you believe is at fault. Connect the two leads together with the wire jumper. Attempt to run the heater with the jumper installed between the two wire leads. If the heater functions properly, replace that sensor or switch and retest the functionality. If the heater functions normally after the replacement of the sensor or switch you have resolved the issue. If not, test further. This does not work on all sensors as some of the sensors indicate a closed condition while others indicate an open one. If you are familiar with using a multimeter it is better to test each sensor for resistance and cross reference that against manufactured specifications.
ERR PS – Pressure Switch
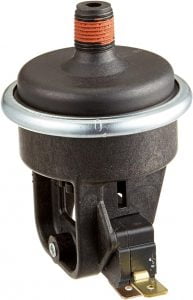
ERR PS and PS means there is not enough water flowing through the heater. Check to make sure the filters are clean, the pump is running normally, and there are no blockages in the lines due to clogged SWG, full skimmer basket, or pump basket issues. The pressure switch may have also just gone bad. Run a jumper between the two wire leads as explained here to bypass and check the function of the pressure switch.
Another possibility with a pressure switch is that it has been adjusted incorrectly. The pressure switch has a small gear wheel on the top that is adjusted based on how high above or below the pool water level the heater is installed.
If the heater is installed level with the pool water the pressure switch should be left at its factory setting of 3.0 PSI
If the heater is installed up to 1 foot below water level, reset the pressure switch so that it is open when the pump is off and closed and then the pump is running.
To adjust the pressure switch rotate the star gear clockwise to raise the setting (ie. The heater is below pool level) or counterclockwise to lower the setting (ie. The heater is above the pool.
If the heater is more than 5 feet above or 4 feet below your pool water level the pressure switch will not function properly. In place of a pressure switch, a flow switch must be installed.
*Incorrectly setting the pressure switch may cause the heater to fire and run with inadequate flow causing catastrophic heater damage. Ensure water flow is correct anytime the heater is in operation.
If you determine your pressure switch may be the cause of your swimming pool heater issue you can purchase a replacement switch at the following link:
ERR HLS – High Limit Switch
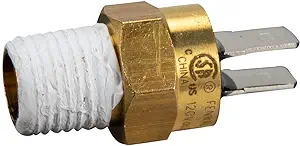
ERR HLS or HLS means that the water temperature after the 1st pass through the heat exchanger is more than 135 degrees Fahrenheit. This could be due to low flow, a bad HLS sensor, or a bad thermal regulator. Over time these sensors and regulators can corrode and must be replaced. Make sure the wires are connected securely to the HLS sensor and that the temperature regulator operates normally.
If you determine your high-limit switch or thermal regulator may be the cause of your swimming pool heater issue you can purchase a replacement at the following link:
High Limit Switch

Thermal Regulator

ERR AFS – Air Flow Switch
ERR AFS or AFS indicates a blockage of air or low flow of air. This could be due to a bad blower motor, blocked inlet, or clogged or leaking vacuum line. Bypass the AFS to determine if it’s a sensor problem. Replace the vacuum lines with ¼ I.D. by 3/8 O.D. clear plastic tubing to ensure no obstructions are interfering with vacuum pressure to the sensor. When you select the heater to “ON” ensure you can feel air flowing out through the exhaust and that you hear the blower turn on.
If you determine your air flow sensor switch may be the cause of your swimming pool heater issue you can purchase a replacement switch at the following link:
AFS Switch

Pressure Switch

If you would like to purchase clear plastic tubing to replace your vacuum lines please visit the following link:
Vacuum Lines
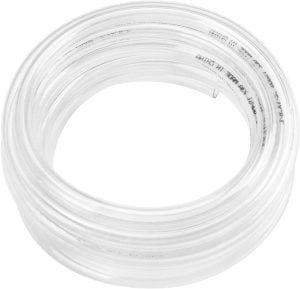
ERR IGN – Igniter

If you have an ERR IGN error or If you do not show any errors on the main heater control display or on the circuit board one possible cause could be the ignitor.
Typically when the ignitor is bad your heater will try to cycle on. You will smell gas and see a blinking heater light. This means the heater is calling for ignition and heat but for some reason, the heater is unable to light off. It will usually cycle and try to light off a few times before giving a service heater light code.
To test the ignitor disconnect the electrical plug from the ignitor. Place your multimeter in ohms mode. The leads should test at 50-100 ohms. If it tests at anything less than 50 or more than 100 replace your ignitor. A replacement ignitor can be found at the following link:
ERR AGS – Automatic Gas Shut-off

If the water temperature after the 2nd pass through the heat exchangers is more than 140 degrees Fahrenheit your automatic gas shutoff sensor may be bad. When the AGS sensor fails your front panel buttons will be disabled. After replacing the AGS sensor you may need to reset the heater to restore the function to the buttons. To purchase a replacement AGS sensor click the following link: AGS Sensor
How to correctly size gas pipe for Pentair Mastertemp heater
The following calculator is for reference and troubleshooting only. Always consult the appropriate Pentair Mastertemp Heater Manual for your model of heater to size your gas line properly.
ERR SFS – Stack Flue Sensor

This error indicates the stack flue/exhaust temperature is more than 480 degrees Fahrenheit. This could be due to a blockage in the stack flue or a bad sensor. This error could be in conjunction with an E06 or an E05 error as well.
Sometimes to show the code you can press the pool and temperature up buttons together on the pool heater control panel. This occasionally will indicate an error.
One way to check what the stack flue sensor is reading for exhaust heat is to press and hold the pool button on the heater control. This will switch the readout from water temperature to exhaust temperature. This temperature should climb to no more than 380 degrees and should be above 170 degrees within 3 minutes.
If the temperature stays below 150 degrees and the exhaust stays cold, check the heat exchanger for leaks, soot, or low flow.
To check for low flow:
- Check filter cleanliness
- Check that the salt cell is clean
- Check to ensure the pump is operating at the normal RPMs and is unobstructed by a dirty pump basket.
- Check the pool pump basket for cavitation or air in the system.
Another way to check and see if the stack flue sensor is causing the error is by using a multimeter. Place the leads of a multimeter on each of the stack flue sensor jumper wires. It should read above 3.4-4 Mega Ohms depending on the outside temperature.
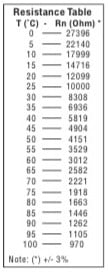
If you determine the sensor is bad, replace the stack flue sensor with the part at the following link to see if the heater function is restored. Similar to the AGS sensor you may need to power cycle the heater to restore functionality to the heater buttons.
Stack flue sensor replacement part
Sometimes it is more than one problem that is involved with a sensor. If the heater still doesn’t work after changing the stack flue sensor, check the wires that run back from the stack flue sensor to the control board to ensure no wire insulation is removed and that the wires are not grounding out prematurely. Ensure no cuts, breaks, or broken sections.
If that doesn’t fix the issue, check the ignition module for proper grounding. Any corrosion can cause a problem. Clean the ground lead of any corrosion found.
Check the thermal regulator for function under hot tap water. Ensure it opens and closes with temperature increases and decreases.
Check the J5 and J8 connections on the control board for corrosion, dirt, or dust. Make sure all pins and connectors are clean.
If replacing the stack flue sensor, and you have checked all of these things and the pool heater still shows an E05 or E06 error, replace the heater control board.
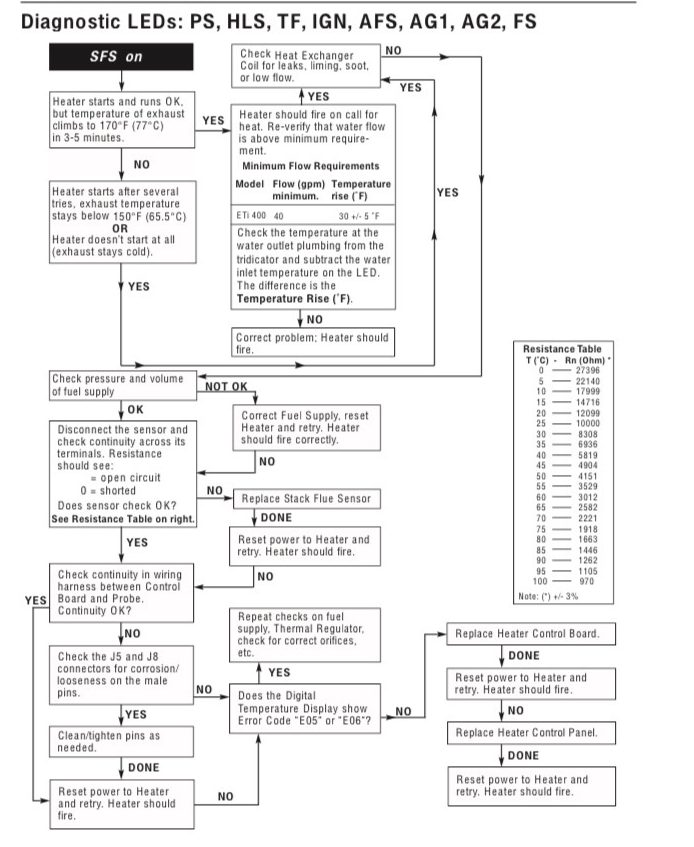
E05
This error indicates an open stack flue sensor.
E06
This error indicates a shorted stack flue sensor
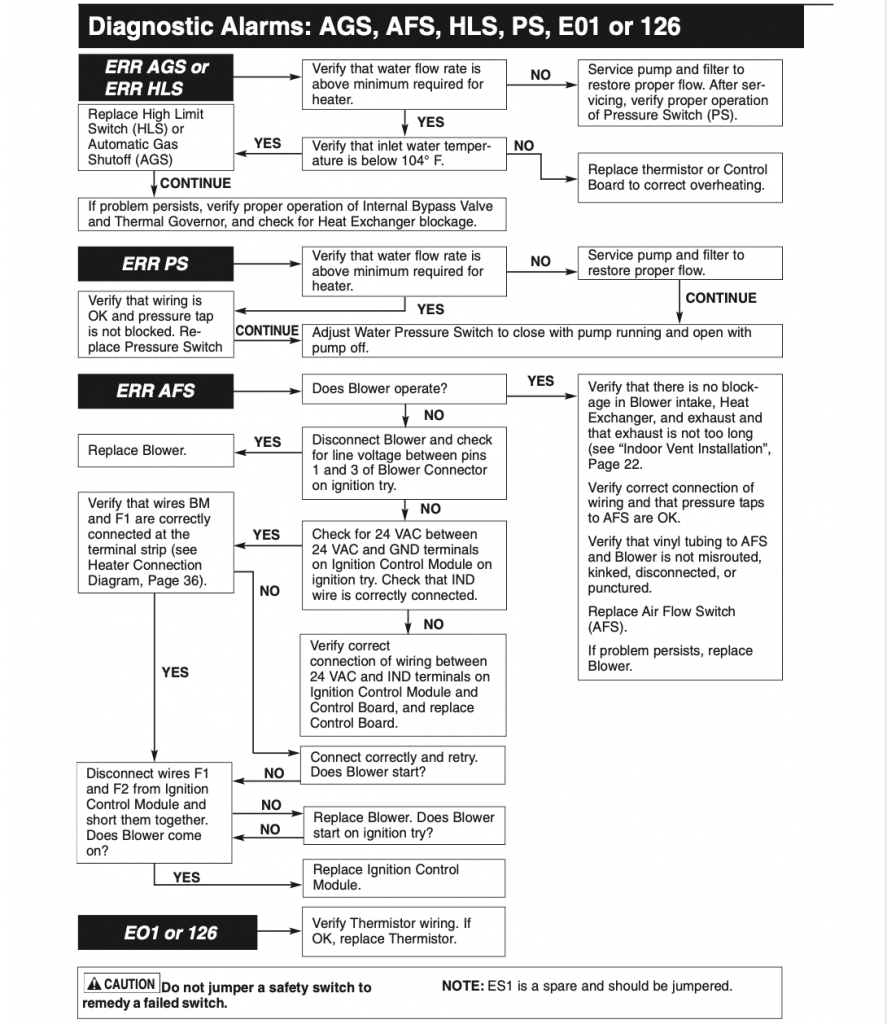
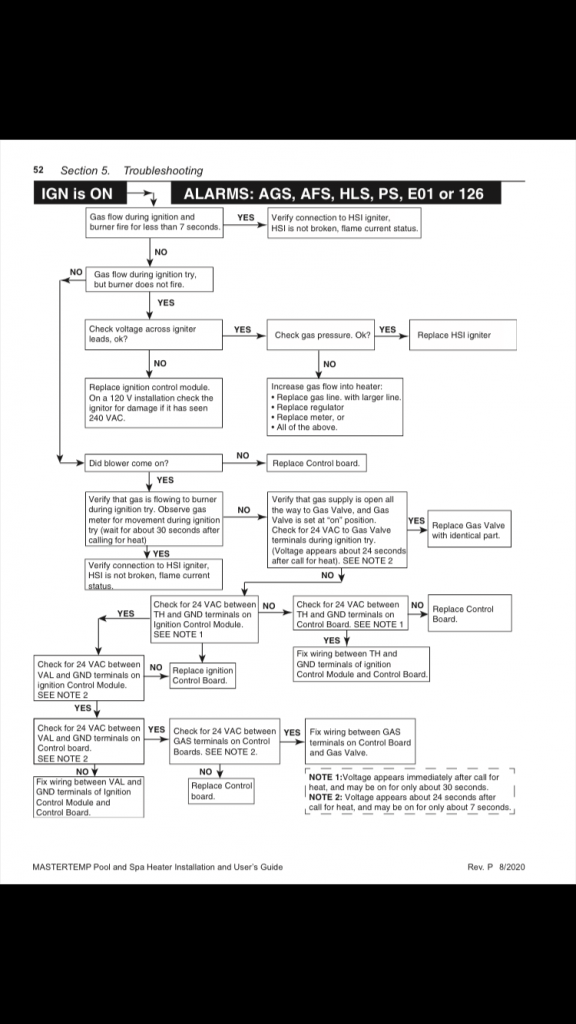
For E05 AND E06 error codes follow the following flow chart to resolve.
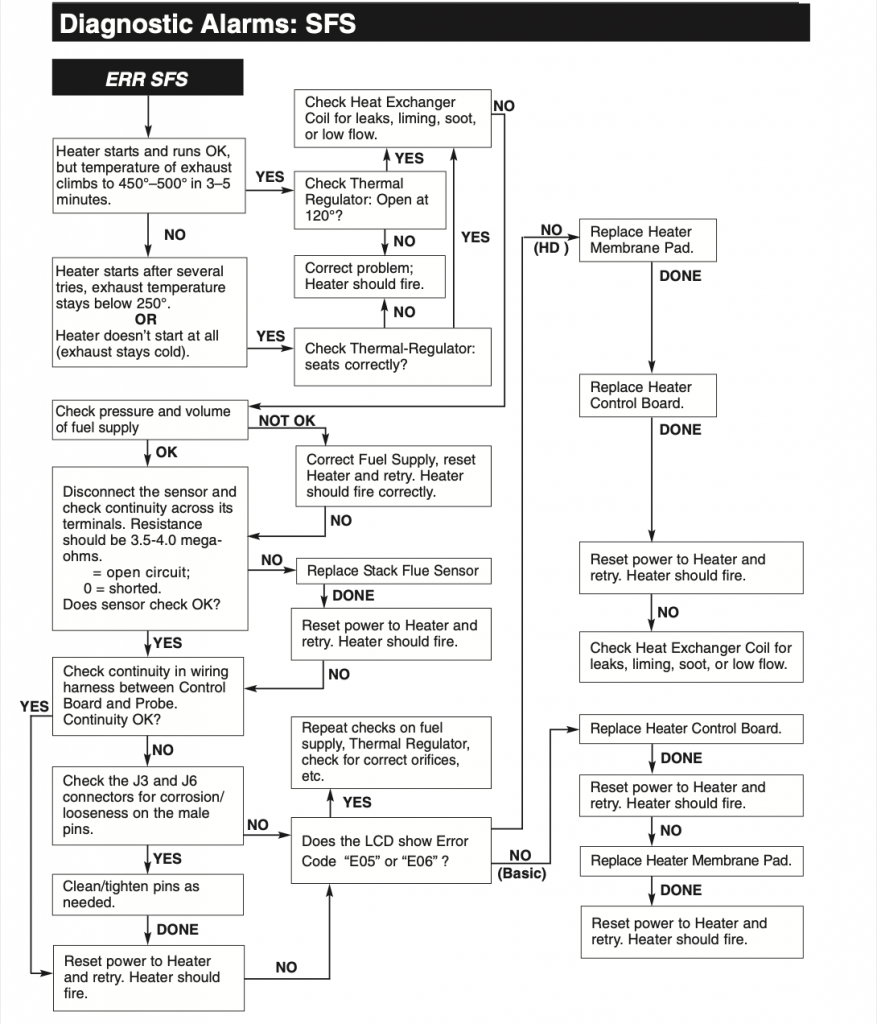
E01
This error indicates an open water temperature sensor, To clear the error the HEATER OFF button must be pressed.
126
This error indicates a shorted water temperature sensor.
For E01 AND 126 error codes follow the following flow chart to resolve. (This flow chart can also help diagnose and resolve AGS, AFS, HLS, and PS errors.)
How do I know if I have a bad Pentair Mastertemp Heater control board?
If you have gone through this article and replaced the things that have been suggested and your heater is still not operating how it should you could have a bad control board. A new control board from Pentair can be over $500 so make sure you try all the other steps outlined and replace anything else you suspect may be the issue. Typcially signs of a bad board would be:
-The stack flue sensor has been replaced but is still giving an error
-The temperature you have set with your automation and heater do not match up
-You continue to get random errors after replacing all the other items on this troubleshooting guide.
-Your heater does not get up to temperature after replacing the thermistor, igniter, and thermal regulator
To replace your control board it is best to have the new one on hand and just remove the wire connections one at a time and replace them with the new board. This ensures you do not install it incorrectly. It is also recommended to replace the membrane at the same time.
If you have found this guide helpful or need further assistance with your heater repair, feel free to reach out to Splash Doctor Pool Service for more information.
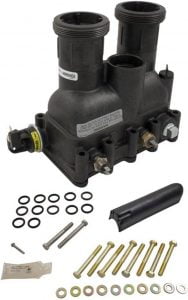
Pentair Manifold Replacement
If you have a leak, break, crack, or broken manifold on your Pentair Mastertemp 125, 250, or 400, Pentair has provided instructions for how to replace this part in their Sta-Rite Max-E-Therm Heater Manifold Replacement Instructions pdf found at this link. This guide is taken from this manual to provide more clarity.
.
- Turn off the power to the heater and the filter pump.
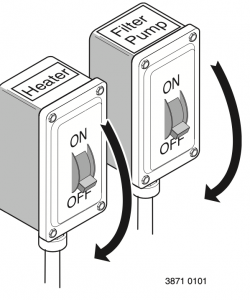
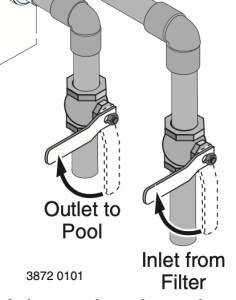
2. Close the water inlet and outlet valves to isolate the heater from the system.
3. Close the gas valve. If it is necessary to move the heater, disconnect the gas line at the union.
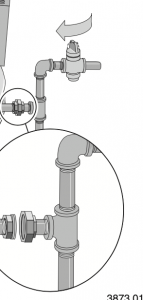
4. Drain the heater with the drain plug towards the bottom of the manifold.
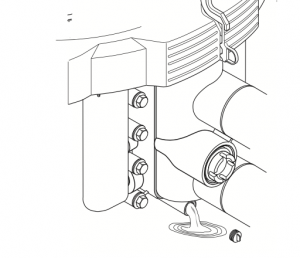
6. Loosen the union collars that connect the 2-inch PVC to the heater. When the heater is empty, disconnect the unions completely.
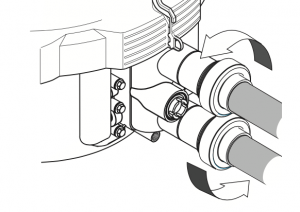
7. Separate and remove any side panels or manifold panels to gain better access to the manifold. The two side covers come off with a simple flathead screwdriver. The manifold side small cover comes off by pulling upwards.
Remove the switch covers and disconnect the wires from the safety switches. The wires are color-coded and marked for the switches they are connected to. Take a quick photo to ensure you can connect the wires to the correct sensors.
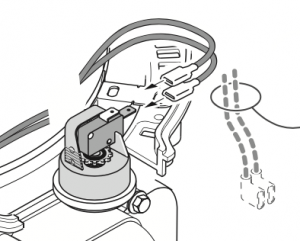
8. Carefully remove the spring-loaded thermal regulator. Use a screwdriver sideways on the cover cap to turn counter-clockwise to remove
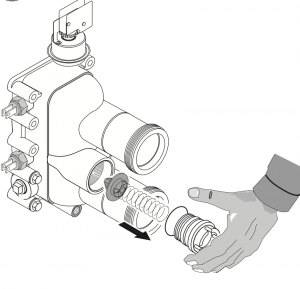
9. Carefully remove the manifold and any adapters by removing the bolts along the sides.
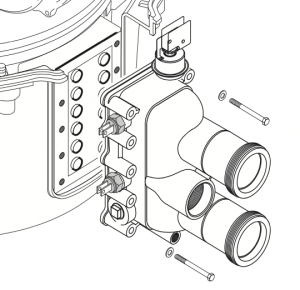
10. Clean the tube sheet and O-ring sealing surface with a nylon brush, then brighten the tube sheet surface with 320-grit emery cloth. NOTE: When cleaning, be careful not to use the tube sheet in the combustion chamber. If you do, thread a couple of bolts into it and pull it back in place.
Brush off all dust and debris with a brush and wipe it down with a clean microfiber cloth.
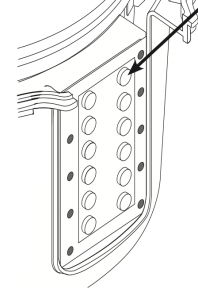
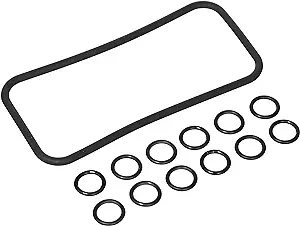
11. Apply silicone grease to the new O-rings. Install O-rings on the tube ends; install the manifold. Install all bolts to hand tighten only.
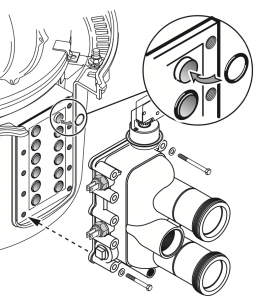
12. BE CERTAIN THAT ALL BOLTS ARE ENGAGED AND HAND TIGHT BEFORE YOU PROCEED TO THE NEXT STEP
Torque the bolts in the sequence shown for your specific model of heater. Some noise (popping etc) is normal as you tighten.
Go around the manifold and retighten the bolts as you need. BOLTS SHOULD BE TIGHTENED TO 75-115 in.-lbs.
Pentair Mastertemp 125
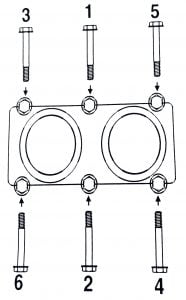
Pentair Mastertemp 250 and 400
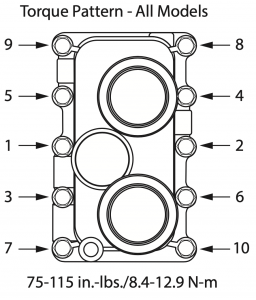

13. Reconnect all wires to the switches and sensors.
14. Reinstall the thermal regulator.
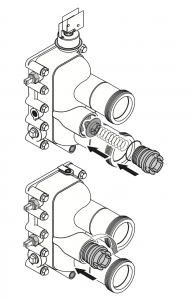
15. Reconnect all gas lines, PVC lines, and wires that were removed in previous steps.
16. Start and run the filter pump for several minutes before starting the heater in order to purge all air from the system. Open the filter pressure relief valve to ensure no air is remaining. Run the pump until a solid stream of water is coming from the filter.
17. Check gas unions with soapy water for leaks if any gas line was removed or loosened.
18. Ensure all gas lines are tight with no leaks before you start the heater.
Pentair Mastertemp Manifold O-ring Kit
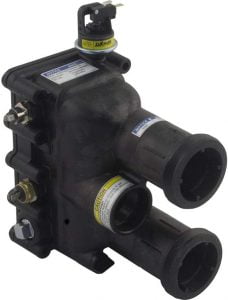
Pentair Mastertemp 250 Manifold
Pentair Mastertemp 400 Manifold
Burner Troubleshooting
If you are having issues with your Pentair Mastertemp burner lighting, staying lit, or heating properly there are several common causes you may be experiencing. The following flow chart and table may help solve the problem.
Symptom
Loud, High Pitched whine
Cause
Flame is too rich.
Remedy
Verify pressure tap between gas valve and blower inlet. Verify the gas regulator setting is -.2″ of water column. Contact a qualified technician or service agency to replace the gas orifice.
Symptom
The flame is fluttery. The exhaust may have an acrid smell or the burner may fail to stay lit.
Cause
Flame is too lean.
Remedy
Verify the gas regulator setting is -.2″ of water column. Contact a qualified technician or service agency to replace the gas orifice.
Symptom
The burner pulsates or surges, especially on ignition.
Cause
The exhaust vent is too long.
Remedy
Reduce the length of the exhaust vent and/or the total number of elbows.
Symptom
Combustion appears normal but the flame does not stay lit.
Cause
The flame current is not being sensed.
Remedy
Check for wet or damaged igniter with a low resistance to the ground. Igniter should test between 50-100 ohms. Replace with new igniter. Verify burner flame holder is properly grounded. Replace the ignition control module.
Heat Exchanger Troubleshooting
One of the most common issues with your heat exchanger would be a bumping sound that may indicate the water is boiling in the heat exchanger.
The possible causes of this symptom are:
Low water flow to the heater
To troubleshoot this issue, check your pump basket, skimmer basket, pool filter, and salt cell for any blockages. Fix these issues and ensure your pump is running at least 40 GPM and it should fix this issue.
Heater exchanger is plugged
If the heat exchanger is plugged this could be due to high calcium levels, high pH, or any other incorrect water chemistry. You may require a new heat exchanger if fixing chemical levels does not solve the problem.
The manifold bypass valve is stuck open.
Check and service the manifold bypass valve.
The thermal governor is stuck closed
Replace the thermal governor.
Another issue your heat exchanger might experience is sweating. If you detect sweating your thermal governor has failed and you must replace it.

